Hi all friends!
Hola a todos!
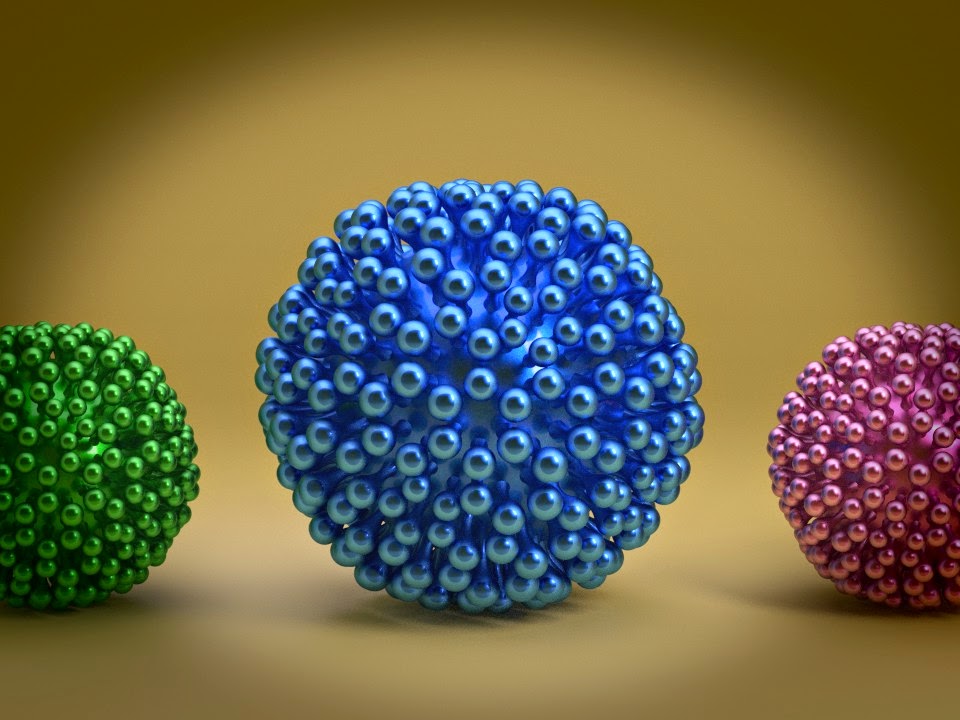
The vignetting is a technique which simulates a kind of effect caused by traditional camera lens on its pictures. It consists of the corners of the image appear dimmed. Digital cameras mimics this effect to give an artistic touch to the photo.
El viñeteado es una ténica que simula efectos producidos por la lente en cámaras tradicionales en sus fotos. Consiste en que las esquinas de la imagen aparecen oscurecidas. En las cámaras digitales se imita este efecto para dar un toque artístico a la foto.
You can create a vignetting effect in Blender through compositing. I'm going to take a render and create this effect through the node editor.
En Blender se puede crear un efecto de viñeteado a través de la postproducción (compositing). Voy a tomar un render y con ayuda de nodos crearé el efecto.
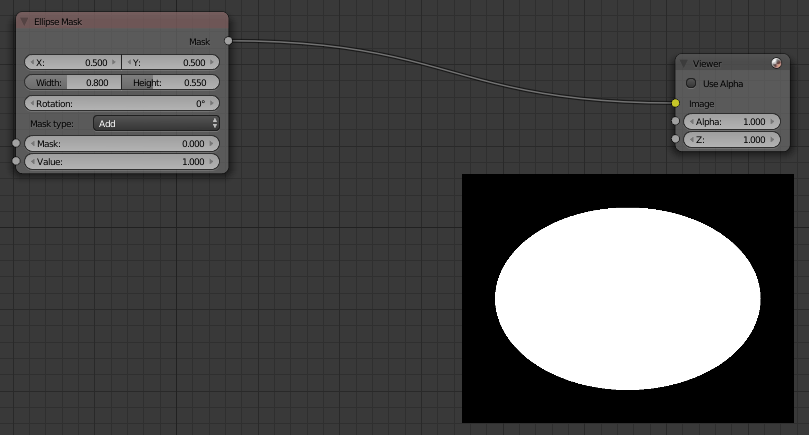
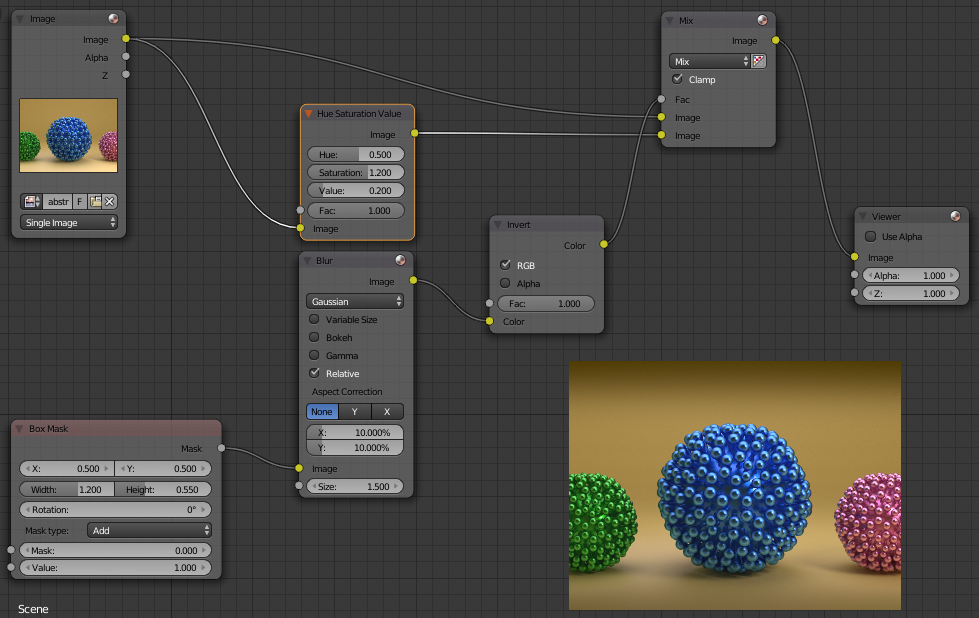
Firtsly I have placed an Ellipse Mask node for creating the rounded shape. You can see the Viewer output on the right bottom corner.
En primer lugar tomaré el nodo Máscara Elíptica (Ellipse Mask) con el objetivo de generar la forma redondeada. En la esquina inferior derecha puedes ver el resultado del nodo Viewer.
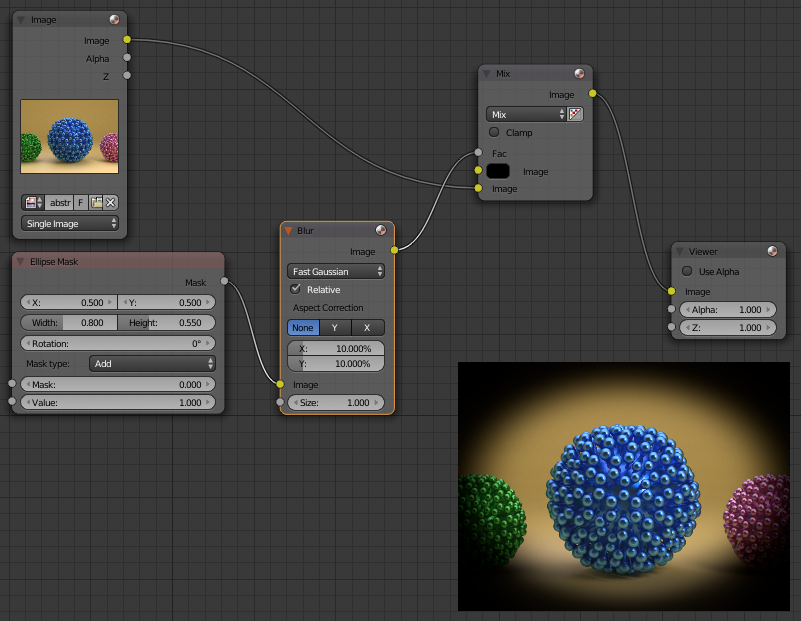
After that I have used a Blur node to create a gradient between the white and black parts of my mask. In my tests I have used the Fast Gaussian method of the node, but for your final version you can use other methods, which are slower but produce better results.
Después utilizaremos un nodo Blur para crear un degradado entre la parte blanca y la parte negra de mi máscara. Para las pruebas he utilizado el método Fast Gaussian de éste nodo, aunque para la versión final puedes usar alguno de los otros métodos más lentos pero que producen mejores resultados.
Now I can connect my render with the mask. I have used a Mix node (with mix mode) so I have gotten the render with a rounded balck border arount it.
Ahora es el momento de conectar nuestra imagen renderizada con la máscara. Utilizando un nodo Mix (tipo de mezcla mix) podemos crear un borde redondeado oscuro alrededor de la imagen.
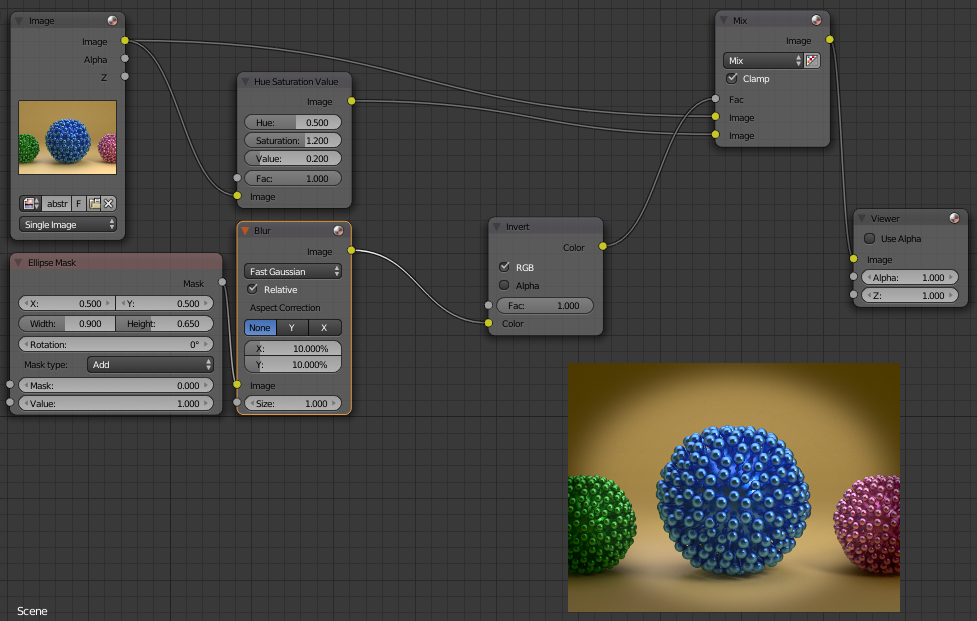
We can change the black border by a dark version of the render, as it ocurrs in photographic cameras. I have used a Hue Saturation Value node, increasing the Saturation parameter and decreasing the Value parameter. The Invert node is not needed here (you only have to change de image order in the Mix node), but if you want to test other mix modes like Overlay or Darken, it's needed using the Mix node on this way.
Podemos sustituir un el borde negro por una versión oscurecida de nuestro render, como ocurre con las cámaras fotográficas. Para ello he utilizado un nodo Hue Saturation Value, aumentando el parámetro Saturation y reduciendo el parámetro Value. El nodo Invert (invertir) no es necesario en este ejemplo (sólo tienes que cambiar el orden de las imágenes en el nodo Mix), pero si deseas experimertar con otros tipos de mezcla como Overlay o Darken, es más útil usar el nodo Mix de esta manera.
In the Mix node you can use other mix modes or use a Color Ramp node or a RGB Curves node to control the mixing factor.
En el nodo Mix puedes usar otros modos de mezcla o usar un nodo Color Ramp o de Curvas RGB para controlar el factor de mezcla.
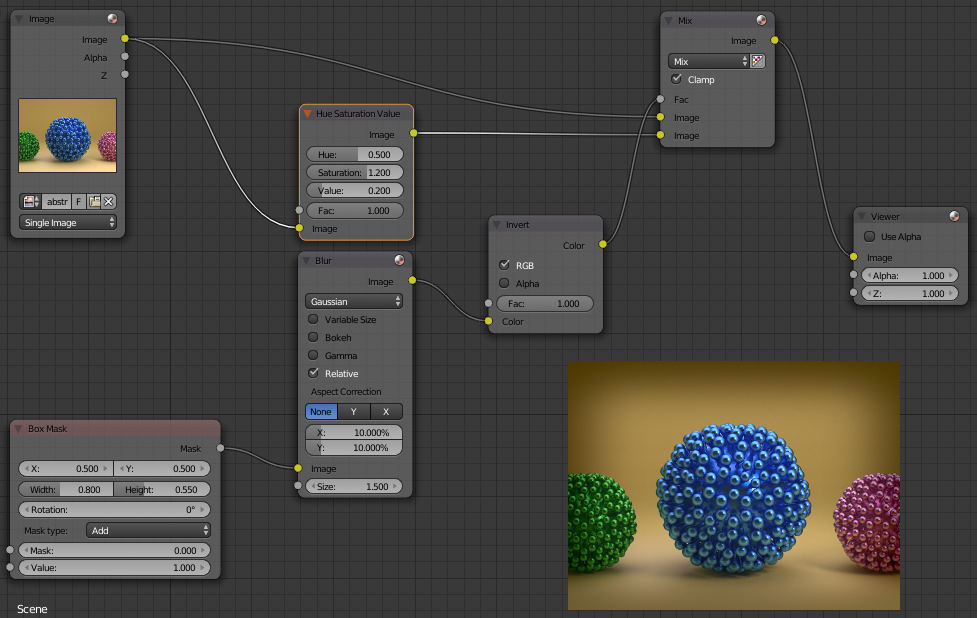
Finally, it exists another mask node with a rectagular shape. It is called Box Mask node. So you can create a rectagular vignetting.
Por último existe también otro nodo de máscara con forma rectangular (Box Mask). De este modo puedes crear un viñeteado rectangular.
Or through tweaking the margins you can create a horizontal gradient in the center of the image.
O jugando con los márgenes crear una especie de degradado horizontal en el centro de la imagen.
I hope you like it this mini tutorial.
Espero que os haya gustado este mini tutorial.
Bye!
Hasta la vista!
miércoles, 17 de septiembre de 2014
jueves, 14 de agosto de 2014
SSS Plastic Material
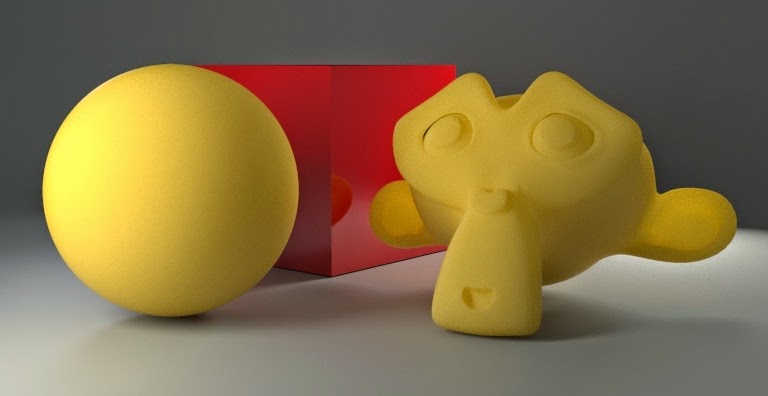
Hi everybody. Today I'm going to show you how to make a realistic plastic material like this:
Firstly, I recommend you to see this video tutorial about how to setup a SSS node in Cycles made by @pauljs75.
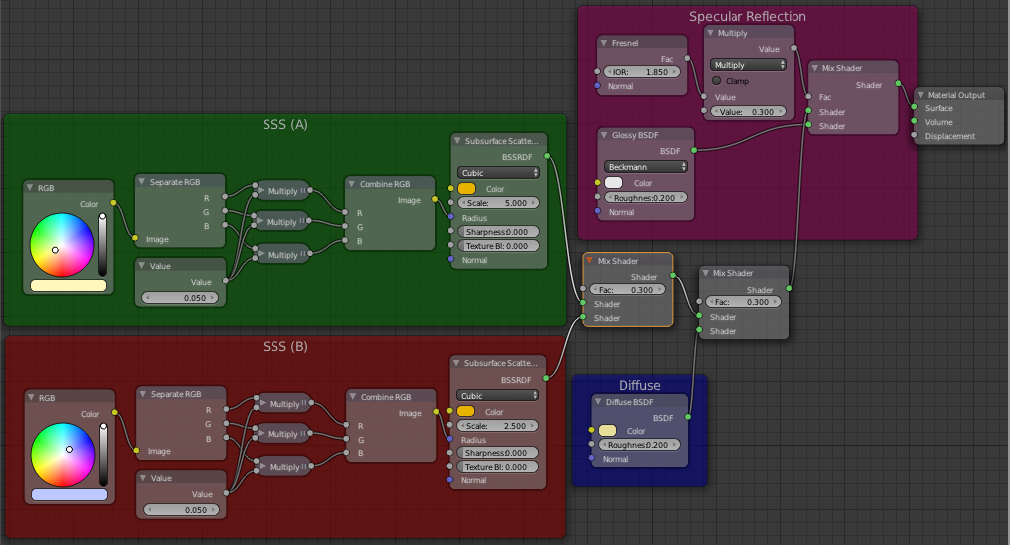
The overall setup of the yellow plastic is as follows:
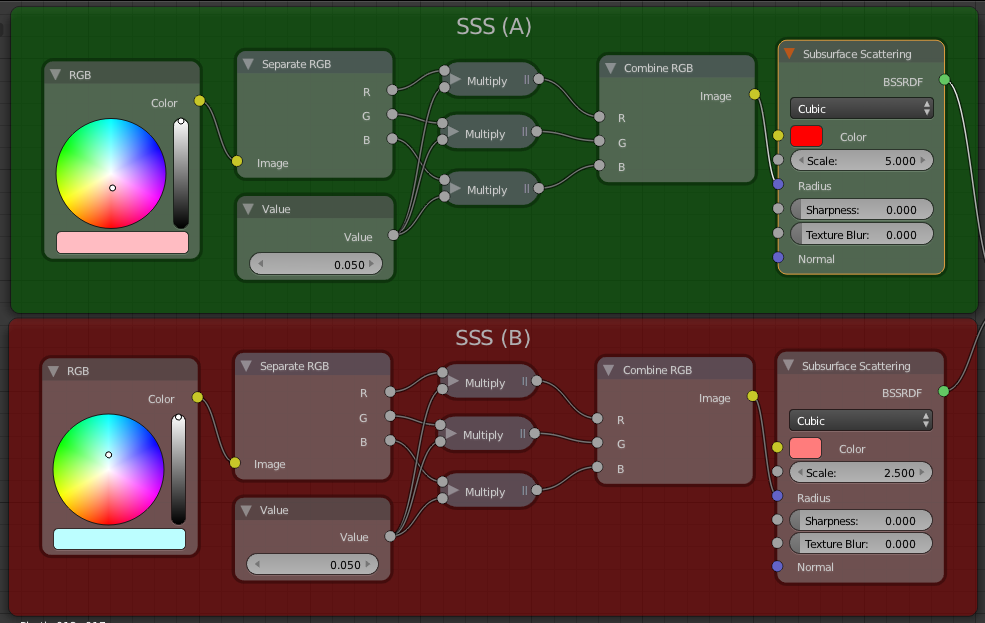
I have used two SSS nodes to get my base SSS material. I have used the method explained in the video tutorial. The color of the SSS node is the base color of the shader. The color of the RGB node is the scattered color.
(I should have created a node group with this setup)
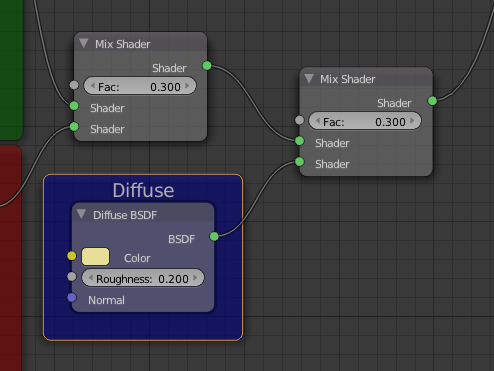
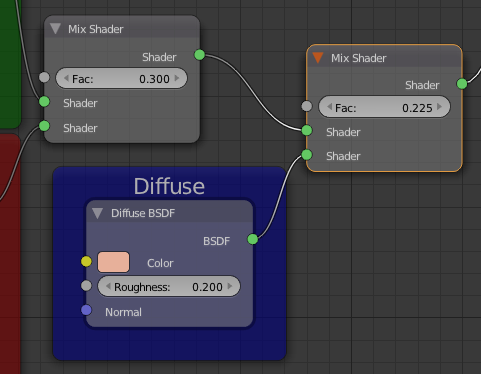
Also I have added a diffuse node to reduce the noise of my material.
Finally I have added some basic glossiness to my material
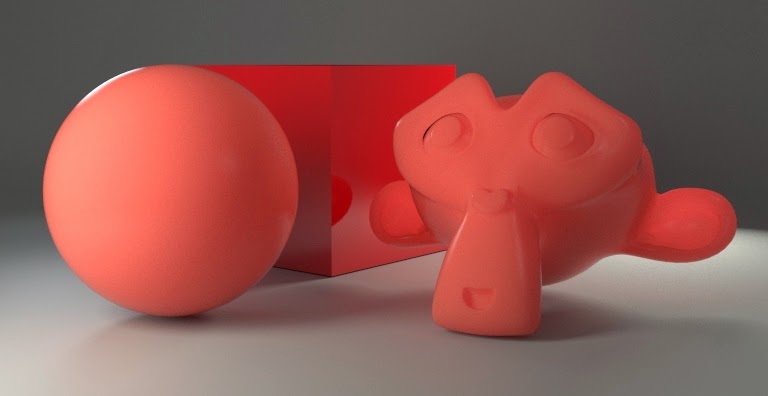
The red plastic is slightly different. Here you can see the node detail:
As the SSS materials are very noise, I strongly recommend you to use compositing and bilateral blur nodes to get a good render. You can find some video tutorials explaining this on CGCoockie:
I used it in my Funky Cube render in the begining of this article.
Bye
miércoles, 2 de abril de 2014
La muerte de Windows XP
El próximo 8 de abril de 2014 Microsoft va a dejar de dar soporte técnico a Windows XP ¿Qúe significa ésto? Si en su hogar o en su empresa sigue utilizando todavía Windows XP es necesario que vaya pensando ya en un cambio de sistema operativo, bien a una versión posterior de Microsoft o bien a otro tipo de sistema operativo, por ejemplo uno basado en Linux como Ubuntu. Estas son las razones por las que debe plantearse ya esta cuestión:
- Los programas que esté usando dejarán de tener versiones y actualizaciones para Windows XP. Es sólo cuestión de tiempo que dejen de tener en sus páginas web versiones de los programas para él. Muchos programas de software libre ya han anunciado que sus próximas versiones no estarán disponibles para XP, por lo que tendrá que trabajar con programas antiguos.
- Si se compra un periférico nuevo o cualquier dispositivo que conecte con un ordenador, los fabricantes ya no crearán drivers para XP. Ratones, impresoras o cámaras de fotos nuevas le indicarán que sus drivers y su software es sólo otras versiones de Windows.
- Entornos de ejecución de programas, como Java o Flash, dejarán de actualizar su software para windows XP, con lo que los programas nuevos que se ejecuten en ellas podrían dar problemas. Por ejemplo muchas aplicaciones de firma electrónica web usan Java. ¿Qué pasará cuando la web de Hacienda o la Seguridad Social pida una versión de Java no soportada por Windows XP?
- Los navegadores tampoco se actualizarán. Por ejemplo la última versión del Microsoft Internet Explorer para XP en la 8. En Windows 7 y 8 puede usar hasta la 11. Muchos sitios web pueden empezar a pedir que como mínimo sea necesario utilizar la versión 9 u otras posteriores para que funcionen todos sus componentes. Dejará de ver de forma adecuada esas páginas o incluso no podrá utilizarlas.
- Los creadores de virus y malware seguirán buscando recovecos de XP para ejecutar sus programas dañinos. Los antivirus de versiones XP podrían dejar de actualizarse de manera adecuada en cualquier momento. Con el tiempo esos equipos serán más vulnerables.
martes, 11 de marzo de 2014
Blender Cycles: Rendering Tips (WIP)
Hi everybody. In this article I'm going to write brief tips that I use in my cycles renders. I hope they will be useful for you. This article is in process.
Hola a todos. En este artículo voy a ir poniendo breves consejos que yo mismo utilizo en mis renders. Espero que os sean útiles. Este artículo está en elaboración.
Hola a todos. En este artículo voy a ir poniendo breves consejos que yo mismo utilizo en mis renders. Espero que os sean útiles. Este artículo está en elaboración.
- For creating a plastic or ceramic material use a mixture between a Diffuse node and a Glossy node.
- Para crear un material de tipo plástico o cerámico usa una mezcla entre un nodo difuso (Diffuse) y un nodo de brillo (Glossy)
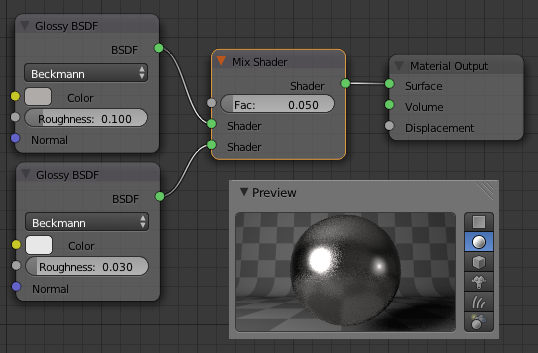
- For creating a metal material use a mixture between two Glossy nodes.
- Para crear un material de tipo metal usa una mezcla (Mix) de dos nodos de brillo (Glossy)
- In the real world there are not completely diffuse materials. Almost all materials reflect light at gracing angles at least (for example, paper). So use always some kind of reflection.
- En el mundo real no hay materiales completamente difusos. Casi todos los materiales reflejan luz al menos en angulos cercanos al paralelo de la superficie (por ejemplo el papel). Así que usa siempre algún tipo de reflexión.
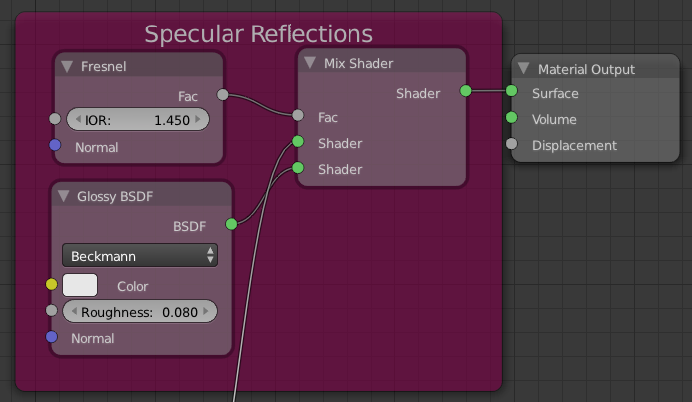
- Using Fresnel or Facing factors for glossiness makes the materials for curved or spherical surfaces more realistic.
- Usar factores Fresnel o Facing para el brillo hace los materiales de superficies curvas o esféricas más realistas.
- Kind of Glossiness depending on the roughness value:
- 0.0 > Sharp. This option ignores the roughness value.
- Less than 0.3 > Beckmann
- Greater than 0.3 > GGX. It is more realistic.
- Tipo de brillo (Glossy) según el valor de la aspereza:
- 0.0 >> Sharp. Se ignora el valor con este tipo).
- Menor que 0.3 >> Beckmann
- Mayor que 0.3 >> GGX. Es más realista.
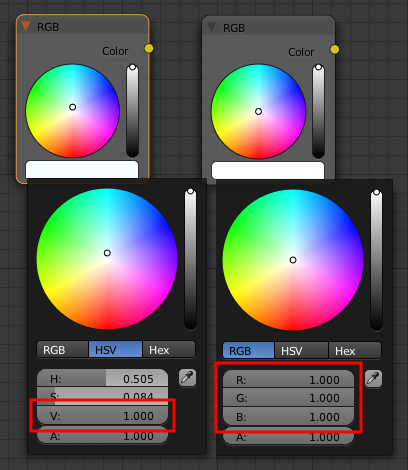
- Don't use colors with Value (in HSV format) greater than 0.8 for Diffuse, Glossy, Velvet and Anisotropic shaders. It produces fireflies in renders and rarely occurs in the real world.
- No use colores con valor (en formato HSV) mayor de 0.8 para shaders difuso, de brillo, de tercipelo o anisótropo. Produce puntos luminosos en los renders y raramente ocurren en el mundo real.
- In shaders which let light rays go inside the surface of objects, that is, Glass, Refraction, Translucent and SSS shaders, use a Value (in HSV format) near to 1.0. Otherwise you will get too opaque materials or with a very dark transparence.
- En shaders que dejan pasar los rayos de luz dentro de los objetos, es decir, shaders de vidrio, refracción, translúcido o de dispersión bajo superficie, usa un valor (en formato HSV) próximo a 1.0. De otro modo conseguirás materiales demasiado opacos o con una transparencia muy oscura.
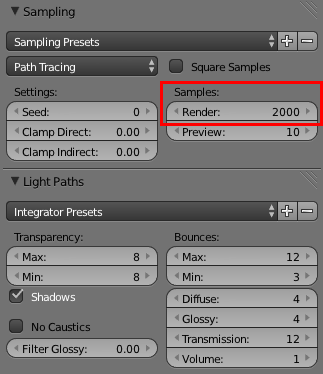
- For reducing the noise of your render you should increase the number of samples, not the number of bounces.
- Para reducir el ruido de tu render deberías incrementar el número de samples, nunca de bounces.
- Meshlights (objects with emission shader) don't produce Shadow pass. If you need it for your compositing, you must use Lamps.
- Los objetos de luz (objetos con shader de emisión) no producen pase de sombra. Si lo necesitas en tu postproducción debes usar lámparas.
- You can use Ambient Occlusion node in your material without checking Ambient Occlusion in the World setup. The Distance parameter is activated, so you can configure how AO works.
- Puedes usar el nodo de oclusión ambiental en tu material sin marcar oclusión ambiental en la configuración del mundo. El parámetro distancia estará activado, de modo que puedes configurar cómo funciona la oclusión ambiental.
- If your material is very noisy, for example those with Translucent shader or SSS shader, use compositing and Bilateral Blur node to avoid it.
- Si tu material tiene mucho ruido, por ejemplo aquellos con shader traslúcido (Translucent) o de dispersión bajo superficie (SSS), utiliza postproducción y el nodo de difuminado bilateral (Bilateral Blur) para evitarlo.
- Remember you can create a procedural World in your scene using Texture nodes.
- Recuerda que puedes crear un mundo de modo procedral en tu escena usando nodos de texturas.
martes, 25 de febrero de 2014
Red Eroded Coral Material
Hi everybody! Today I'm going to show you how to make a red eroded coral material in blender / cycles:
¡Hola a todos! Hoy voy a mostraros como hacer un material de tipo coral rojo erosionado con blender y cycles:
This is the overview of the material:
Esta es la visión general del material:
This is the zoom on the left hand side in the material:
Este es el zoom de la parte izquierda del material:
I have mixed three Voronoi Textures to get the bumping of the material (see turquoise frame). I have used a Value node and two Math node with the Multiply option to centralize the scaling my textures. If the value of the Value node is changed, all the textures changes in the same proportion. By plugging these textures in Bump nodes and chaining them I get a kind of eroded surface.
Regarding the purple frame, I have used two of the Voronoi textures to find the holes on the surface and set a different color for them. They are the white spots of the coral.
He mezclado tres texturas de tipo Voronoi para conseguir el relieve del material (ver recuadro turquesa). He usado un nodo Valor y dos nodos Matemáticas con la opción Multiplicar para centralizar el escalado de mis texturas. Si se cambia el valor del nodo Valor, todas las texturas cambian en la misma proporción. Conectando estas texturas con nodos de Relieve (Bump) y encadenándolos conseguimos una especie de superficie erosionada.
Respecto al recuadro morado, he usado dos de las texturas Voronoi para hallar los agujeros sobre la superficie y darles un color diferente. Son las manchas blancas del coral.
The right hand side of the material contains the shaders of it:
La parte derecha del material contiene los shaders del mismo:
The red frame is a simple material: a mixing of a diffuse and glossy shaders with fresnel factor. After that I have added it a Translucent shader. So the material absorbs some light.
El recuadro rojo es un material simple: una mezcla de shaders difuso y de brillo, con un factor de mezcla fresnel. Después de eso le he añadido un shader translúcido. Así el material absorbe algo de luz.
This is an abstract render which I did with this material (HD version here):
Este es un render abstracto que hice con este material (versión HD aquí):
Hope you like it. Bye
Espero que os haya gustado. Hasta la vista
martes, 11 de febrero de 2014
Scratched Metal Material
Hi every body. Today I'm going to show you a scratched metal material:
(1) Preview of the node setup explained in this article
(2) Preview of the node setup with parameters modified for the last render below
This is the basic node setup of the material:
As you can see, the material is a simple Glossy node wich is added a scratched bumping. You can change the Glossy node by another metal or a material of you own.
The main element of the Scratched Pattern node group is a tweaked Voronoi texture, which produces a streaky pattern:
This is the Map Range node group included:
This tweaked Voronoi texture produces some spots painted on your texture. The number of spots depends on the Threshold parameter (1.0 for all spots, <1 .0="" a="" apply="" effect="" get="" i="" if="" less="" need="" or="" scratched="" spots="" streaked="" the="" to="" want="" you="">Mapping Vector
node scaling the texture in this way:
The Scratched Pattern node group contains eight groups of Mapping-Tweaked Voronoi nodes.
This is the comparison of one Tweaked Voronoi or eight of them with different rotations:
Finally, the eight nodes are mixed using a Darken node. I have done a version of this node adapted for numbers:
Now you can experiment with the Vector/Scale/Threshold parameters of the Scratched Pattern node group. If you scale the pattern too much you will get a kind of stainless steel metal material:
Finally here there is a scene made by me using this material (HD version here):
Bye
miércoles, 22 de enero de 2014
Testing CGTrace's Material Ball
Hi. I have been testing the CGTrace's Material Ball:
Carpaint:
Colombia Gold:
Blood:
Its author, Victor Borges says that it is similar to other testing scenes used with Mono software. I really like the color strips beside the ball and the scene loads and renders faster than @Tuqueque's Blender Ball. However I think it can be improved. I will continue making tests and post them here in this article.
These are more screenshots with the scene modified:
These are the tweaks I have done on the blendswap scene:
Carpaint:
Colombia Gold:
Blood:
Its author, Victor Borges says that it is similar to other testing scenes used with Mono software. I really like the color strips beside the ball and the scene loads and renders faster than @Tuqueque's Blender Ball. However I think it can be improved. I will continue making tests and post them here in this article.
These are more screenshots with the scene modified:
- Blood:
- Colored Glass:
- Brown Leather:
These are the tweaks I have done on the blendswap scene:
- Recalculating all normals
- Changing Diffuse materials to roughness 0.1, so they use Oren-Nayard algorithm
- Changing Color light to Blackbody 6500 (like a fluorescent or white LED light)
- Adding a Cube which wraps all the objects, so the black world is not reflected. Its material is Diffuse RGB(0.6, 0.6, 0.6) and roughness 0.1.
Suscribirse a:
Entradas (Atom)

